Terraced Terrain Generator (TTG)
Terraced Terrain Generator (TTG) is a free Unity tool for procedural generation of spherical and planar terraced terrain meshes. It’s open source and it’s on GitHub!

Contents
- Features
- Importing
- Usage
- Samples
- Compatibility and dependencies
- Roadmap
- Technical aspects
- Contributing
- Getting help
- License
Features
- Planar and (ico)spherical terrains.
- Pseudorandom procedural terrain generation.
- Deterministic procedural terrain generation with parameterized seed.
- Both synchronous and asynchronous (with
async/await) support. - Reduced GC allocations using native constructs (e.g.
NativeArrayandNativeList). - Customizable:
- For planar terrains: basic shape from 3 to 10 sides.
- Number of terraces.
- Terrain size and maximum height.
- Detail level (a.k.a. fragmentation depth).
- Sculpting features (hills and valleys):
- Base frequency.
- Octaves.
- Persistence (when more than 1 octave is being used).
- Lacunarity (when more than 1 octave is being used).
- Terrace heights.
- Height distribution.
Importing
The first step to get started with TTG is to import the library into your Unity project. There are two ways to do so: via the Package Manager using a git URL, and via OpenUPM.
Import using a git URL
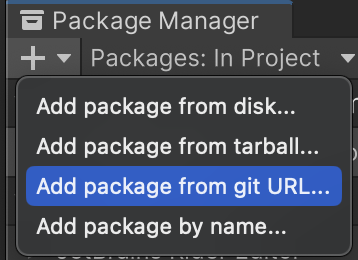
This approach uses Unity’s Package Manager to add TTG to your project using the repo’s git URL. To do so, navigate to Window > Package Manager in Unity. Then click on the + and select “Add package from git URL”:

Next, enter the following in the “URL” input field to install the latest version of TTG:
https://github.com/lazysquirrellabs/ttg.git?path=Assets/Libraries/TerracedTerrainGenerator
Finally, click on the “Add” button. The importing process should start automatically. Once it’s done, TTG is ready to be used in the project.
Import with OpenUPM
TTG is available as a package on OpenUPM. To import TTG into your project via the command line, run the following command:
openupm add com.lazysquirrellabs.terracedterraingenerator
Once the importing process is complete, TTG is ready to be used in the project.
After importing
After importing TTG, check the Usage section on how to use it and the Samples section on how to import and use the package samples.
Usage
There are two different ways to use TTG: via controller components or via the API. Both methods share the same parameter list, explained below.
- Fragmentation depth: how many times the basic shape will be fragmented to form the terrain. The larger the value, the greater the level of detail will be (more triangles and vertices) and the longer the generation process takes.
- Relative terrace heights: an array of terrace heights, relative to the terrain’s maximum height. Values must be in the [0, 1] range, in ascending order. Each terrace’s final height will be calculated by multiplying the relative height by the terrain’s height. The length of this array dictates how many terraces will be generated.
-
Sculpt settings: a group of settings used to sculpt the terrain—the process of creating hills and valleys using Perlin noise. These settings include:
- Base feature frequency: the number of terrain features (hills and valleys) in a given area on the first iteration (a.k.a. octave) of the sculpting process. This value must be greater than zero.
- Octave count: how many iterations of the sculpting process will be performed. Each iteration will be performed with a lower intensity and higher frequency as the previous one. This value must be greater than zero. When this value is 1, persistence and lacunarity are ignored.
- Persistence: how much of an octave’s amplitude (a.k.a. “strength”) will be carried to the next octave. The lower the value, the quicker octave details disappear with each iteration. This value must be in the (0, 1) range.
- Lacunarity: how much the frequency increases (multiplication factor) between octaves. In other words, how much more detail each octave will contain, when compared to the previous one. This value must be greater than one.
- Height distribution: the height distribution over the terrain. In short, how low valleys and how high hills should be, and everything in between. It’s represented as a curve that must start in (0,0) and end in (1,1). If this value is null, a canonical value (a linear curve that won’t affect the distribution) will be used.
- For planar terrains:
- Side count: number of sides of the terrain’s basic shape (3 to 10).
- Radius: the greatest distance between the center of the mesh and all of its vertices (ignoring their position’s Y coordinate). This number must be greater than zero.
- Maximum height: the maximum distance between the lowest and highest vertices of the terrain. This number must be greater than zero.
- For spherical terrains:
- Minimum height: the distance between the center of the sphere and the terrain’s lowest point.
- Maximum height: the distance between the center of the sphere and the terrain’s highest point.
The two usage methods will differ only on how they provide these parameters and how they use the terrain generation output.
Component-based usage
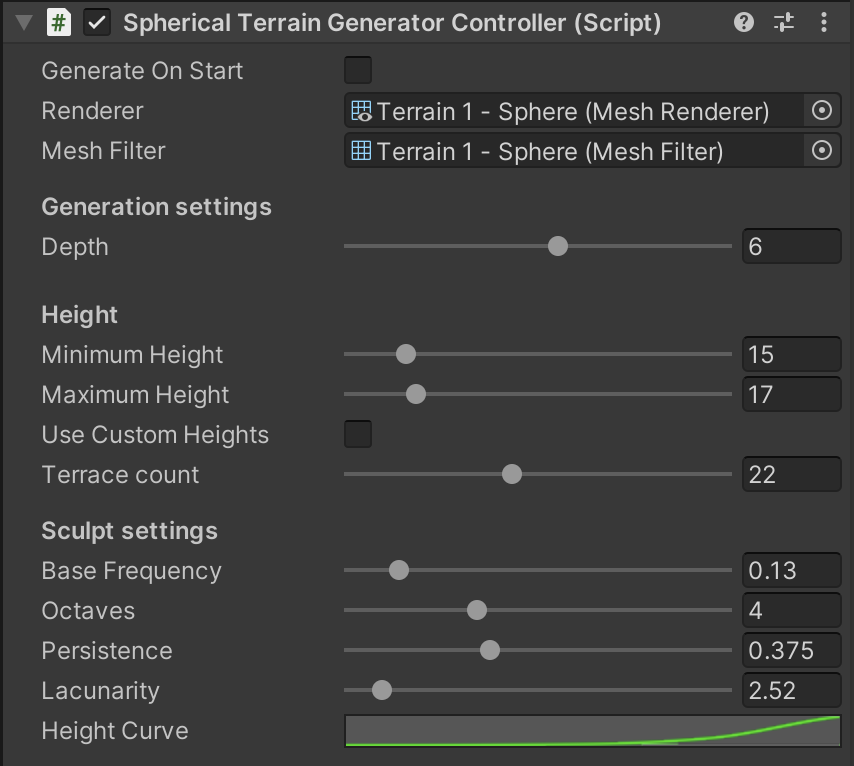
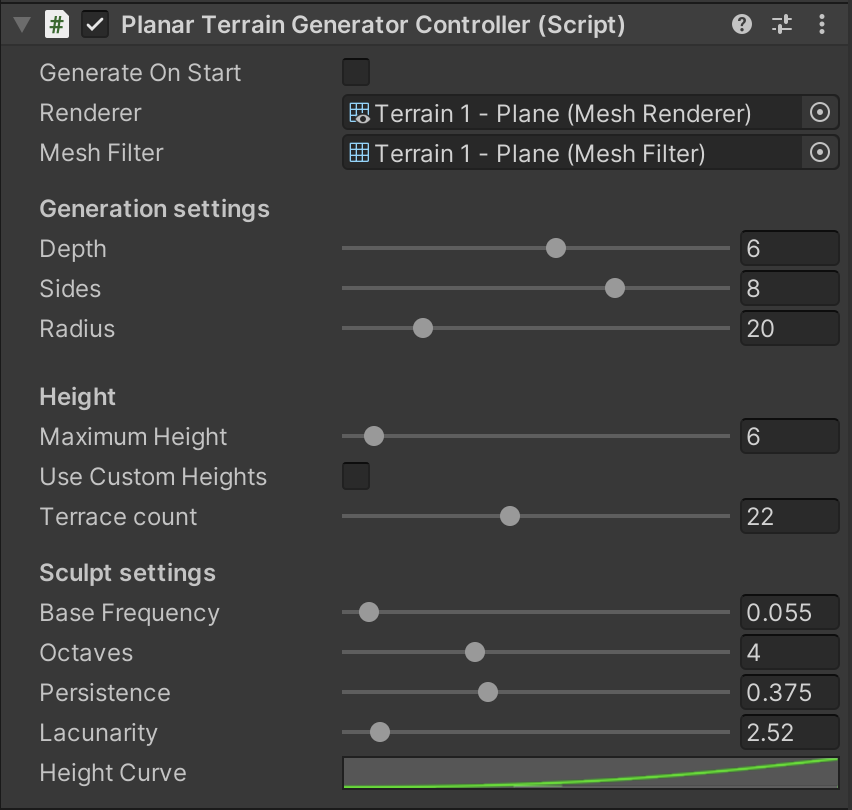
The easier way to jump into TTG is to use one of its controller components: SphericalTerrainGeneratorController and PlanarTerrainGeneratorController (for spherical and planar terrains, respectively). To get started, add a component instance to a game object. A Mesh Renderer and a Mesh Filter will be added automatically if the game object doesn’t contain them yet. The pictures below display examples of inspectors from spherical and planar controller components , respectively:


These components contain all parameters explained in the previous section, in addition to the following fields:
- Generate on start: whether a new terrain should be generated on start. This feature is great to quickly test generation parameters.
- Renderer: the
MeshRendererthat will be used to render the terrain. - Mesh filter: the
MeshFilterthat will contain the terrain’s mesh. - Use Custom Heights: whether a custom relative terrace heights array will be provided.
- If true, the relative heights array will be available for customization. The length of this array will dictate how many terraces will be generated.
- If false, a “Terrace Count” field will be available and can be used to customize how many terraces will be created. In this case, the relative terrace heights array will be automatically generated and its values will be equally distributed between 0 and 1.
Both controller classes inherit from TerrainGeneratorController, which exposes four generation methods:
// For pseudorandom synchronous generation:
public void GenerateTerrain();
// For pseudorandom asynchronous generation:
public async Task GenerateTerrainAsync(CancellationToken token);
// For reproducible synchronous generation:
public void GenerateTerrain(int seed);
// For reproducible asynchronous generation:
public async Task GenerateTerrainAsync(int seed, CancellationToken token);
The first two methods are meant for pseudorandom procedural generation—when the generated terrain doesn’t need to be reproduced in the future. The other methods are meant for reproducible procedural generation—when we would like to generate the exact same terrain in the future. The seed parameter will be used to feed the randomizer and it’s enough to reproduce an entire terrain. If you’re aiming for reproducible terrains, use the last two methods. The task of generating random seed values is up to the user. The asynchronous methods support task cancellation via a cancellation token. If the token’s source is cancelled, an OperationCanceledException might be thrown.
The controllers manage the lifetime of the meshes they generate, and destroy them once they’re not being used anymore (including when the component itself is destroyed). If you would like to manage mesh lifetime yourself, use the API (described below) instead.
API usage
The more advanced (and more flexible) way of using TTG is via its API, using the SphericalTerrainGenerator and PlanarTerrainGenerator classes, both inheriting from TerrainGenerator. The API method method is better suited for editor usage and dynamic terrain generation at runtime. Its usage isn’t too different from the component-based approach seen above: the generation parameters are the same and there’s a 1:1 mapping between generation methods. In fact, the generator controller classes are just convenient (MonoBehaviour) wrappers around SphericalTerrainGenerator and PlanarTerrainGenerator.
Generating a terraced terrain via the API requires two steps:
- Creating a
TerrainGeneratorinstance via one of the child classes’ constructor. - Calling one of its generation methods.
The generation data is stored on the TerrainGenerator instance and is immutable. That means that once a generator is created, it will always create terrains using the given generation data. This class represents one instance of the terraced terrain generator (there can be multiple). Each of the classes that inherit from TerrainGenerator have only one constructor:
public SphericalTerrainGenerator(float minHeight,
                                 float maxHeight,
                                 float[] relativeTerraceHeights,
                                 SculptSettings sculptSettings,
                                 ushort depth)

public PlanarTerrainGenerator(ushort sides,
                              float radius,
                              float maximumHeight,
                              float[] relativeTerraceHeights,
                              SculptSettings sculptSettings,
                              ushort depth)
The parameters (including the sculpt settings) are the same ones explained at the beginning of the Usage section. The sculpt settings are grouped in the SculptSettings struct, which exposes two constructors:
// For pseudorandom procedural generation
public SculptSettings(float baseFrequency,
                      uint octaves,
                      float persistence,
                      float lacunarity,
                      AnimationCurve heightDistribution)
// For reproducible procedural generation
public SculptSettings(int seed,
                      float baseFrequency,
                      uint octaves,
                      float persistence,
                      float lacunarity,
                      AnimationCurve heightDistribution)
Once the TerrainGenerator instance is created, we can actually generate terrains using its two generation methods:
// For synchronous generation
public Mesh GenerateTerrain();
// For asynchronous generation
public async Task<Mesh> GenerateTerrainAsync(CancellationToken token);
The asynchronous method supports task cancellation via a cancellation token. If the token’s source is cancelled, an OperationCanceledException might be thrown.
It’s important to point out that the user is responsible for resource management (in this case, meshes). The API doesn’t automatically clean terrain meshes up.
And that’s it. No other types or methods are exposed. The ones above are sufficient to use all TTG features via the API.
Example
Let’s say we would like to generate random planar, octagonal terrain with 5 terraces, 20 units radius, maximum height of 9.5 units and a fragmentation depth of 4. For sculpting, we would like 5 octaves, a base frequency of 0.075, a persistence of 0.375 and a lacunarity of 2.52. First, let’s create the height distribution curve. For real-world usage, it would be handy to serialize this curve so it’s easily editable in the inspector. Here, for the sake of simplicity, let’s use a linear curve declared in code:
var heightDistribution = AnimationCurve.Linear(0f, 0f, 1f, 1f);
To create the sculpt settings, we first pass the feature frequency (0.075), followed by the number of octaves (5), the persistence (0.375), the lacunarity (2.52) and finally, the height distribution created on the step above:
var sculptSettings = new SculptSettings(0.075f, 5, 0.375f, 2.52f, heightDistribution);
Next, let’s choose the relative terrain heights for the 5 terraces:
var relativeHeights = new[] { 0f, 0.2f, 0.6f, 0.87f, 1f };
Finally, let’s call the PlanarTerrainGenerator constructor to create the planar terrain generator, passing the number of sides of the terrain’s basic shape (8 for octagon), the radius (20), the maximum height (9.5), the previously created relative terrace heights and sculpt settings, and the fragmentation depth (4).
var generator = new PlanarTerrainGenerator(8, 20, 9.5f, relativeHeights, sculptSettings, 4);
Once we’ve constructed a TerrainGenerator, we can simply ask it to generate a new terrain. For example, if we would like to generate the terrain synchronously:
var mesh = generator.GenerateTerrain();
The call to GenerateTerrain returns a Mesh representing the generated terraced terrain. It is up to the user to manage the lifetime of this mesh. Here’s an example of asynchronous terrain generation:
var mesh = await generator.GenerateTerrainAsync(token);
Once we’ve got a reference to the terrain mesh, we can use it with a mesh filter:
[SerializeField] private MeshFilter _meshFilter;
// ...
_meshFilter.mesh = mesh;
The generated Mesh will contain as many submeshes as the number of generated terraces. Consequently, the MeshRenderer component that will render the terrain requires the same amount of materials to properly render all terraces. Failing to assign the necessary materials will cause some terrains (the highest ones) to not be rendered.
The source code of the controller classes SphericalTerrainGeneratorController and PlanarTerrainGeneratorController (described in the previous section) offer great examples of API usage and can serve as inspiration to API newcomers.
Samples
The package contains three samples:
- Display: this sample generates hand-picked terrains with different characteristic. It’s a great display of how the materials used by the terrains might influence its mood. It contains 2 scenes: “Display 1.0” contains terrains that could be generated using TTG 1.X and “Display 2.X” contains terrains that can be generated using TTG 2.X. This last scene was used to generate the banner image at the top of this page.
- Randomizer: this sample simply repeatedly creates completely random planar terraced terrains. It’s a great display of the tool’s capabilities and the different types of terrains it can create.
- Parameters test: this sample repeatedly creates random planar terraced terrains that can be somewhat customized. It’s a great tool to quickly test generation parameters. Play with the values in the
PlanarTerrainGeneratorControllercomponent attached to theGeneratorgame object to see how the parameters affect the generated terrains.
To import the samples, open the Package Manager and select TTG in the packages list. Then find the Samples section on the right panel, and click on the “Import” button right next to the sample you would like to import. Once importing is finished, navigate to the Assets/Samples/Terraced Terrain Generator folder. Finally, open and play the scene from the sample you would like to test.
Compatibility and dependencies
TTG requires Unity 2022.3.X or above, its target API compatibility level is .NET Standard 2.1, and depends on the following packages:
com.unity.collections
Roadmap
Although the first versions of TTG are out, the tool is still under (casual) development. The following features are planned in the next versions:
-
Custom terrain heights: instead of evenly spacing the terraces between the terrain’s lowest and highest points, allow custom heights to be chosen.Implemented on version 1.1.0. -
Improve terrain detailing: use Perlin noise octaves to create more natural terrains.Implemented on version 1.2.0. -
Sphere as a basic shape: let’s create completely terraced planets!Implemented on version 2.0.0. - Real-time sculpting: instead of letting an algorithm generate the hills, let the user interactively sculpt them.
- Outer walls: “close” the generated mesh so it looks like a model carved in wood, sitting on a desk.
You can follow TTG’s development progress on its Trello board.
Technical aspects
Technical aspects of TTG were described in the following blogs posts:
- Developing a Terraced Terrain Generator.
- Terraced Terrain Generator performance improvements.
- Adding custom terrace heights to Terraced Terrain Generator.
- Adding more detail to Terraced Terrain Generator using Perlin noise octaves.
Contributing
If you would like to report a bug, please create an issue. If you would like to contribute with bug fixing or small improvements, please open a Pull Request. If you would like to contribute with a new feature (regardless if it’s in the roadmap or not), contact the developer.
Getting help
Use the issues page if there’s a problem with your TTG setup, if something isn’t working as expected, or if you would like to ask questions about the tool and its usage.
License
Terraced Terrain Generator is distributed under the terms of the MIT license. For more information, check the LICENSE file in TTG’s repository.